Module 2: Infrastructure Prep
Learning Objectives
By the end of this module, you will have completed the essential infrastructure preparation components:
-
C1: Red Hat Account Setup - Pull Secret & Installer Download
-
C2: Hardware Inventory - Document Specs Externally
-
C3: DNS Planning - Mandatory Network Requirements
-
C4: Boot Method Setup - Discovery ISO Preparation
-
C5: BIOS Configuration - UEFI, Secure Boot, Network Boot
Modern Infrastructure Approach
This module reflects the simplified infrastructure approach enabled by Assisted and Agent-based installers:
-
No Bootstrap Node: Eliminates temporary infrastructure complexity
-
Automatic Discovery: Hardware detection via discovery ISOs
-
Virtual IP Management: Built-in VIP handling reduces load balancer requirements
-
RHCOS Immutability: External documentation approach respects immutable OS
C1: Red Hat Account Setup - Pull Secret & Installer Download
This component ensures you have the necessary Red Hat resources for both Assisted and Agent-based installations.
Verify Red Hat Account Access
Based on official requirements:
# Test connectivity to Red Hat services
curl -I https://console.redhat.com/
curl -I https://registry.redhat.io/

# Expected: HTTP 200 responses indicating connectivity
echo "✅ Red Hat services connectivity verified"

# Navigate to Red Hat Hybrid Cloud Console:
# https://console.redhat.com/
#
# Account Requirements:
# - Use your Red Hat login name (may differ from email address)
# - Ensure you have Organization Administrator role for full access
# - Verify active OpenShift subscriptions are available

# Document your account information:
cat > account-info.txt << 'EOF'
Red Hat Login: [your-redhat-login]
Organization: [your-organization]
Subscription Type: [Standard/Premium/Partner]
Available Entitlements: [number-of-clusters]
EOF
Download Pull Secret (Critical for Both Installers)
The pull secret provides access to Red Hat container registries:
# Navigate to: https://console.redhat.com/openshift/install/pull-secret
# Click "Download pull secret" and save as pull-secret.txt

# Verify pull secret format (must be valid JSON):
cat pull-secret.txt | jq . > /dev/null && echo "✅ Valid JSON format" || echo "❌ Invalid JSON"

# The pull secret provides access to:
# - registry.redhat.io (Red Hat container images)
# - quay.io (OpenShift operators and components)
# - registry.connect.redhat.com (Partner images)

# Secure the pull secret:
chmod 600 pull-secret.txt
echo "✅ Pull secret downloaded and secured"
Download OpenShift Installer (For Agent-based Method)
The openshift-install binary is required for Agent-based installations:
|
The binary download URLs below point to the OpenShift mirror repository. If you encounter download issues, you can:
|
# Note: Assisted Installer doesn't require local installer binary
# Agent-based Installer requires the openshift-install binary

# For OpenShift 4.21 (recommended - latest supported):
wget https://mirror.openshift.com/pub/openshift-v4/x86_64/clients/ocp/stable-4.21/openshift-install-linux.tar.gz

# For OpenShift 4.20:
wget https://mirror.openshift.com/pub/openshift-v4/x86_64/clients/ocp/stable-4.20/openshift-install-linux.tar.gz

# For OpenShift 4.19:
wget https://mirror.openshift.com/pub/openshift-v4/x86_64/clients/ocp/stable-4.19/openshift-install-linux.tar.gz

# For OpenShift 4.18 (approaching EOL):
# wget https://mirror.openshift.com/pub/openshift-v4/x86_64/clients/ocp/stable-4.18/openshift-install-linux.tar.gz

# Extract and install:
tar -xzf openshift-install-linux.tar.gz
sudo mv openshift-install /usr/local/bin/
chmod +x /usr/local/bin/openshift-install

# Verify installation:
openshift-install version
echo "✅ OpenShift installer ready for Agent-based deployment"
Download Additional Tools (Recommended)
# Download oc CLI tool - pin to the same minor version as your target cluster
# Replace 4.21 with your target cluster version
wget https://mirror.openshift.com/pub/openshift-v4/x86_64/clients/ocp/stable-4.21/openshift-client-linux.tar.gz
tar -xzf openshift-client-linux.tar.gz
sudo mv oc kubectl /usr/local/bin/

# Verify oc installation:
oc version --client
echo "✅ OpenShift CLI tools installed"
✅ C1 Verification Checkpoint: Confirm you have valid Red Hat account access, pull secret, and required tools before proceeding.
C2: Hardware Inventory - Document Specs Externally
Since RHCOS is an immutable operating system, we document hardware specifications using external methods. This component connects to both Standard HA and Compact cluster configurations.
Cluster Configuration Decision
Choose your cluster configuration based on official hardware requirements:
# Document your cluster configuration choice
cat > cluster-config.txt << 'EOF'
# OpenShift 4.19/4.20/4.21 Cluster Configuration Choice

## Standard HA Cluster (3 Control + 2+ Workers)
# Best for: Production environments, workload isolation
# Requirements: 5+ nodes minimum

# Control Plane Nodes (3 required):
# - Minimum: 4 vCPU, 16GB RAM, 100GB storage (Red Hat minimum)
# - Bare Metal Recommended: 16+ vCPU, 64+ GB RAM, 500+ GB SSD
# - Production Typical: 32 vCPU, 128GB RAM, 1TB NVMe SSD
# Reference: https://docs.redhat.com/en/documentation/openshift_container_platform/4.21/html/installing_on_bare_metal/user-provisioned-infrastructure#minimum-resource-requirements_installing-bare-metal

# Worker Nodes (2+ required):
# - Minimum: 2 vCPU, 8GB RAM, 100GB storage (Red Hat minimum)
# - Bare Metal Recommended: 16+ vCPU, 64+ GB RAM, 500+ GB SSD
# - Production Typical: 32+ vCPU, 128+ GB RAM, 1+ TB NVMe SSD
# Note: Size based on workload requirements, not platform minimums

## Compact Cluster (3 Nodes Control+Worker)
# Best for: Edge deployments, resource-constrained environments
# Requirements: 3 nodes exactly

# Compact Nodes (3 required):
# - Minimum: 8 vCPU, 32GB RAM, 120GB storage (Red Hat minimum)
# - Bare Metal Recommended: 32+ vCPU, 128+ GB RAM, 1+ TB SSD
# - Production Typical: 48+ vCPU, 256+ GB RAM, 2+ TB NVMe SSD
# Note: Control plane nodes also run workloads, size accordingly
# Reference: https://docs.redhat.com/en/documentation/openshift_container_platform/4.21/html/installing_on_a_single_node/preparing-to-install-sno#sno-requirements-for-installing-on-a-single-node_preparing-to-install-sno

## Bare Metal Sizing Considerations:
# - CPU: Modern server CPUs (Intel Xeon, AMD EPYC)
# - Memory: ECC RAM recommended for production
# - Storage: NVMe SSDs for best performance, RAID for redundancy
# - Network: 10GbE+ recommended for production workloads
# - Consider future growth and workload requirements

Selected Configuration: [STANDARD_HA / COMPACT]
Justification: [Explain your choice based on requirements]
Planned Node Sizing: [Document your actual server specifications]
EOF
Hardware Requirements Documentation
Create comprehensive hardware inventory based on minimum resource requirements:
# Create detailed hardware inventory
cat > hardware-inventory.txt << 'EOF'
# OpenShift 4.19/4.20/4.21 Hardware Inventory
# Modern Installer Approach - No Bootstrap Node Required!

## Key Advantages of Assisted/Agent-based Installers:
# - No separate bootstrap node needed
# - Automatic hardware discovery via discovery ISO
# - Built-in validation and compatibility checking
# - Virtual IP management eliminates external load balancers

## Supported Architectures:
# - x86_64 (amd64): Primary supported architecture
# - aarch64 (ARM64): Full support for edge deployments
# - ppc64le (IBM Power): High-performance computing
# - s390x (IBM Z/LinuxONE): Mainframe integration

## Hardware Inventory Template:

### For Standard HA Cluster (if selected):
### Control Plane Nodes (3 required):
Node 1:
  Hostname: control-plane-1.cluster.example.com
  CPU Cores: [Document actual cores - Red Hat min: 4, Bare metal recommended: 16+]
  Memory: [Document actual GB - Red Hat min: 16, Bare metal recommended: 64+]
  Storage: [Document actual GB - Red Hat min: 100, Bare metal recommended: 500+]
  CPU Model: [e.g., Intel Xeon Gold 6248R, AMD EPYC 7543]
  Storage Type: [e.g., NVMe SSD, SATA SSD, HDD with RAID]
  Network: [e.g., 10GbE, 25GbE, bonded interfaces]
  Architecture: [x86_64/aarch64/ppc64le/s390x]
  BMC/IPMI IP: [Document management IP]
  Primary MAC: [Network interface MAC address]

Node 2:
  Hostname: control-plane-2.cluster.example.com
  CPU Cores: [Document actual cores - Red Hat min: 4, Bare metal recommended: 16+]
  Memory: [Document actual GB - Red Hat min: 16, Bare metal recommended: 64+]
  Storage: [Document actual GB - Red Hat min: 100, Bare metal recommended: 500+]
  CPU Model: [e.g., Intel Xeon Gold 6248R, AMD EPYC 7543]
  Storage Type: [e.g., NVMe SSD, SATA SSD, HDD with RAID]
  Network: [e.g., 10GbE, 25GbE, bonded interfaces]
  Architecture: [x86_64/aarch64/ppc64le/s390x]
  BMC/IPMI IP: [Document management IP]
  Primary MAC: [Network interface MAC address]

Node 3:
  Hostname: control-plane-3.cluster.example.com
  CPU Cores: [Document actual cores - Red Hat min: 4, Bare metal recommended: 16+]
  Memory: [Document actual GB - Red Hat min: 16, Bare metal recommended: 64+]
  Storage: [Document actual GB - Red Hat min: 100, Bare metal recommended: 500+]
  CPU Model: [e.g., Intel Xeon Gold 6248R, AMD EPYC 7543]
  Storage Type: [e.g., NVMe SSD, SATA SSD, HDD with RAID]
  Network: [e.g., 10GbE, 25GbE, bonded interfaces]
  Architecture: [x86_64/aarch64/ppc64le/s390x]
  BMC/IPMI IP: [Document management IP]
  Primary MAC: [Network interface MAC address]

### Worker Nodes (2+ required for Standard HA):
Node 1:
  Hostname: worker-1.cluster.example.com
  CPU Cores: [Document actual cores - Red Hat min: 2, Bare metal recommended: 16+]
  Memory: [Document actual GB - Red Hat min: 8, Bare metal recommended: 64+]
  Storage: [Document actual GB - Red Hat min: 100, Bare metal recommended: 500+]
  CPU Model: [e.g., Intel Xeon Gold 6248R, AMD EPYC 7543]
  Storage Type: [e.g., NVMe SSD, SATA SSD, HDD with RAID]
  Network: [e.g., 10GbE, 25GbE, bonded interfaces]
  Architecture: [x86_64/aarch64/ppc64le/s390x]
  BMC/IPMI IP: [Document management IP]
  Primary MAC: [Network interface MAC address]

Node 2:
  Hostname: worker-2.cluster.example.com
  CPU Cores: [Document actual cores - Red Hat min: 2, Bare metal recommended: 16+]
  Memory: [Document actual GB - Red Hat min: 8, Bare metal recommended: 64+]
  Storage: [Document actual GB - Red Hat min: 100, Bare metal recommended: 500+]
  CPU Model: [e.g., Intel Xeon Gold 6248R, AMD EPYC 7543]
  Storage Type: [e.g., NVMe SSD, SATA SSD, HDD with RAID]
  Network: [e.g., 10GbE, 25GbE, bonded interfaces]
  Architecture: [x86_64/aarch64/ppc64le/s390x]
  BMC/IPMI IP: [Document management IP]
  Primary MAC: [Network interface MAC address]

### For Compact Cluster (if selected):
Node 1 (Control Plane + Worker):
  Hostname: compact-1.cluster.example.com
  CPU Cores: [Document actual cores - Red Hat min: 8, Bare metal recommended: 32+]
  Memory: [Document actual GB - Red Hat min: 32, Bare metal recommended: 128+]
  Storage: [Document actual GB - Red Hat min: 120, Bare metal recommended: 1TB+]
  CPU Model: [e.g., Intel Xeon Gold 6248R, AMD EPYC 7543]
  Storage Type: [e.g., NVMe SSD, SATA SSD, HDD with RAID]
  Network: [e.g., 10GbE, 25GbE, bonded interfaces]
  Architecture: [x86_64/aarch64/ppc64le/s390x]
  BMC/IPMI IP: [Document management IP]
  Primary MAC: [Network interface MAC address]

Node 2 (Control Plane + Worker):
  Hostname: compact-2.cluster.example.com
  CPU Cores: [Document actual cores - Red Hat min: 8, Bare metal recommended: 32+]
  Memory: [Document actual GB - Red Hat min: 32, Bare metal recommended: 128+]
  Storage: [Document actual GB - Red Hat min: 120, Bare metal recommended: 1TB+]
  CPU Model: [e.g., Intel Xeon Gold 6248R, AMD EPYC 7543]
  Storage Type: [e.g., NVMe SSD, SATA SSD, HDD with RAID]
  Network: [e.g., 10GbE, 25GbE, bonded interfaces]
  Architecture: [x86_64/aarch64/ppc64le/s390x]
  BMC/IPMI IP: [Document management IP]
  Primary MAC: [Network interface MAC address]

Node 3 (Control Plane + Worker):
  Hostname: compact-3.cluster.example.com
  CPU Cores: [Document actual cores - Red Hat min: 8, Bare metal recommended: 32+]
  Memory: [Document actual GB - Red Hat min: 32, Bare metal recommended: 128+]
  Storage: [Document actual GB - Red Hat min: 120, Bare metal recommended: 1TB+]
  CPU Model: [e.g., Intel Xeon Gold 6248R, AMD EPYC 7543]
  Storage Type: [e.g., NVMe SSD, SATA SSD, HDD with RAID]
  Network: [e.g., 10GbE, 25GbE, bonded interfaces]
  Architecture: [x86_64/aarch64/ppc64le/s390x]
  BMC/IPMI IP: [Document management IP]
  Primary MAC: [Network interface MAC address]
EOF

echo "✅ Hardware inventory template created: hardware-inventory.txt"
echo "📝 Complete the inventory with your actual hardware specifications"
External Hardware Verification Methods
Since RHCOS is immutable, use these external methods to verify hardware specifications:
# Method 1: IPMI/BMC Hardware Query
# Reference: https://docs.redhat.com/en/documentation/openshift_container_platform/4.21/html/installing_on_bare_metal/user-provisioned-infrastructure#installation-user-infra-machines-iso_installing-bare-metal
ipmitool -I lanplus -H <bmc-ip> -U <username> -P <password> fru print
ipmitool -I lanplus -H <bmc-ip> -U <username> -P <password> power status

# Method 2: Manufacturer Documentation
# - Server specification sheets and documentation
# - BIOS/UEFI system information screens
# - Virtualization platform specifications (if using VMs)

# Method 3: Live Boot Hardware Detection (Temporary)
# Boot nodes with Linux live USB/CD to gather hardware specs
# This is temporary and won't affect the final RHCOS installation

# Method 4: Virtualization Platform APIs (if applicable)
# VMware vSphere, Red Hat Virtualization, or other platforms
# Query VM specifications through management APIs
✅ C2 Verification Checkpoint: Complete your hardware inventory documentation with actual specifications before proceeding.
C3: DNS Planning - Mandatory Network Requirements
DNS configuration is mandatory for OpenShift deployment. Based on official DNS requirements, choose your approach:
Option A: External DNS (Recommended for Production)
For production environments, configure external DNS based on DNS requirements:
# Create DNS configuration documentation
cat > dns-config.txt << 'EOF'
# OpenShift 4.19/4.20/4.21 DNS Configuration
# Reference: https://docs.redhat.com/en/documentation/openshift_container_platform/4.21/html/installing_on_bare_metal/user-provisioned-infrastructure#installation-dns-user-infra_installing-bare-metal

## Required DNS Records:

### 1. API Server Access (External):
# Format: api.<cluster_name>.<base_domain>
# Points to: Load balancer or VIP for control plane nodes
# Example: api.ocp4.example.com IN A 192.168.1.100

### 2. Internal API Access (Optional):
# Format: api-int.<cluster_name>.<base_domain>
# Points to: Same as API server if on same network
# Example: api-int.ocp4.example.com IN A 192.168.1.100

### 3. Application Ingress (Wildcard):
# Format: *.apps.<cluster_name>.<base_domain>
# Points to: Load balancer or VIP for worker nodes (or all nodes in compact)
# Example: *.apps.ocp4.example.com IN A 192.168.1.101

## Your DNS Configuration:
Cluster Name: cluster
Base Domain: example.com
API VIP/LB IP: [api-ip-address]
Ingress VIP/LB IP: [ingress-ip-address]
EOF

# Test DNS resolution (replace with your actual values):
dig +short api.<cluster-name>.<base-domain>
dig +short test.apps.<cluster-name>.<base-domain>

# Verify reverse DNS (recommended):
dig +noall +answer -x <api-ip-address>
Option B: Installer-Managed VIPs (Simplified)
For lab environments, let the installers handle DNS with Virtual IPs based on VIP management:
# Plan your VIP addresses for installer management
cat > network-config.txt << 'EOF'
# OpenShift 4.19/4.20/4.21 Network Configuration
# VIP Management by Assisted/Agent-based Installers

## Virtual IP Planning:
# API VIP: Automatically managed virtual IP for API access
# Ingress VIP: Automatically managed virtual IP for application access
# Internal DNS: Handled automatically by cluster

## Network Requirements:
Machine Network: [your-network-cidr]  # e.g., 192.168.1.0/24
API VIP: [planned-api-vip]            # e.g., 192.168.1.100
Ingress VIP: [planned-ingress-vip]    # e.g., 192.168.1.101

## DHCP Configuration (if using DHCP):
# Ensure DHCP server can provide IPs to all nodes
# Reserve VIP addresses to avoid conflicts
# Configure DHCP to provide proper DNS servers
EOF

echo "✅ Network configuration planned: network-config.txt"
DNS Verification Commands
Use these commands to verify DNS configuration before installation:
# Test API server DNS resolution (external)
dig +noall +answer api.<cluster-name>.<base-domain>

# Test API server DNS resolution (Optional)
dig +noall +answer api-int.<cluster-name>.<base-domain>

# Test wildcard application DNS resolution
dig +noall +answer test.apps.<cluster-name>.<base-domain>

# Test reverse DNS resolution (recommended)
dig +noall +answer -x <api-vip-ip>

# Verify DNS servers are accessible from nodes
nslookup <dns-server-ip>
✅ C3 Verification Checkpoint: Ensure DNS configuration is planned, documented, and tested before proceeding.
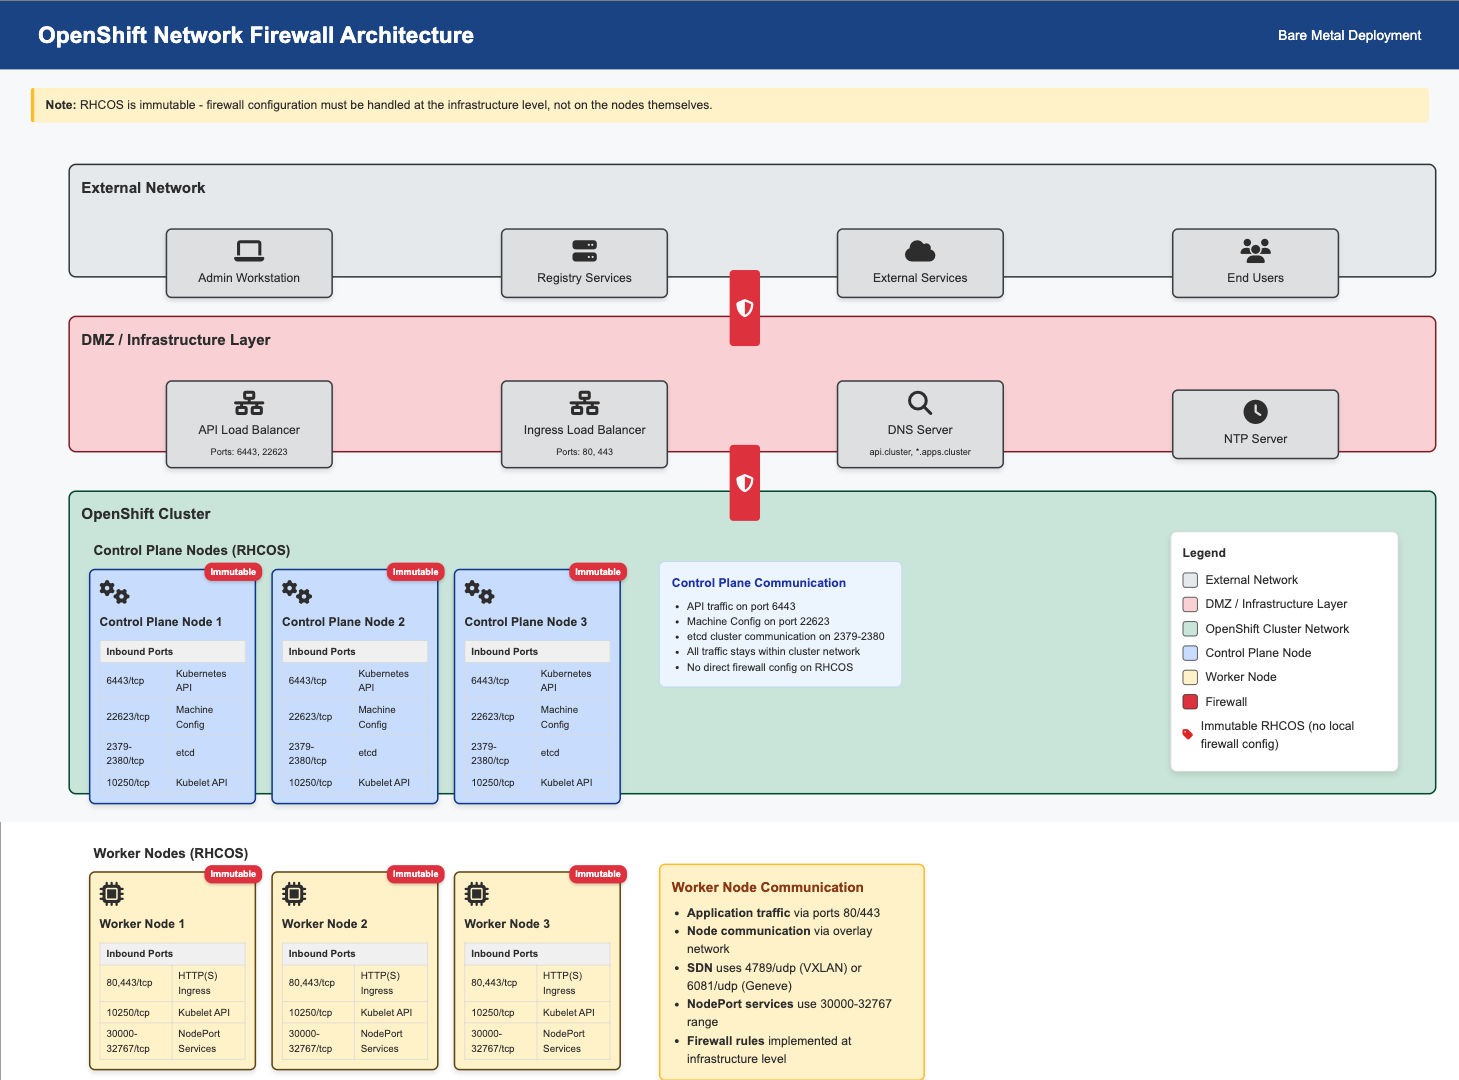
Firewall Configuration Requirements
Firewall rules are critical for OpenShift deployment. Based on network requirements, configure these firewall rules:
Required Firewall Ports
# Create firewall configuration documentation
cat > firewall-config.txt << 'EOF'
# OpenShift 4.19/4.20/4.21 Firewall Configuration
# Reference: https://docs.redhat.com/en/documentation/openshift_container_platform/4.21/html/installing_on_bare_metal/user-provisioned-infrastructure#installation-network-user-infra_installing-bare-metal
#
# Note: OpenShift SDN was removed in OCP 4.20. OVN-Kubernetes is the only
# supported CNI plugin. The legacy VXLAN port (4789/udp) is NOT required.

## Control Plane Node Firewall Rules:

### Inbound Rules (Control Plane):
# Kubernetes API Server
6443/tcp    # External access to Kubernetes API
22623/tcp   # Machine Config Server (internal cluster use only)

# etcd
2379/tcp    # etcd client requests
2380/tcp    # etcd peer communication

# Kubelet
10250/tcp   # Kubelet API

# OpenShift Router/Ingress (if running on control plane in compact)
80/tcp      # HTTP traffic (compact clusters only)
443/tcp     # HTTPS traffic (compact clusters only)

# Network diagnostics and monitoring
9000-9999/tcp   # Host level services (node exporter, etc.)
10250-10259/tcp # Kubernetes services
30000-32767/tcp # NodePort services

### Outbound Rules (Control Plane):
# All outbound traffic allowed (or specific rules for registries)
443/tcp     # HTTPS to Red Hat registries
80/tcp      # HTTP (if needed)

## Worker Node Firewall Rules:

### Inbound Rules (Workers):
# Kubelet
10250/tcp   # Kubelet API

# OpenShift Router/Ingress
80/tcp      # HTTP traffic
443/tcp     # HTTPS traffic

# Network diagnostics and monitoring
9000-9999/tcp   # Host level services
30000-32767/tcp # NodePort services

### Outbound Rules (Workers):
# All outbound traffic allowed (or specific rules for registries)
443/tcp     # HTTPS to Red Hat registries
80/tcp      # HTTP (if needed)

## Network Overlay Protocol:
# Geneve (OVN-Kubernetes - the only supported CNI since OCP 4.20)
6081/udp    # Geneve overlay network (OVN-Kubernetes)

# ICMP
icmp        # Network diagnostics and connectivity testing

## Load Balancer Health Checks:
# Configure health check sources to access:
6443/tcp    # API server health checks
22623/tcp   # Machine Config Server (restrict to cluster internal network)
80/tcp      # Ingress health checks
443/tcp     # Ingress health checks
1936/tcp    # Ingress router health check endpoint (/healthz/ready)
EOF

echo "✅ Firewall configuration documented: firewall-config.txt"
Network Firewall Architecture for RHCOS
Since RHCOS is an immutable operating system, firewall configuration must be handled at the network infrastructure level, not on the nodes themselves.
Infrastructure Firewall Configuration
Configure firewalls at the infrastructure level (not on RHCOS nodes):
# Document infrastructure firewall approach
cat >> firewall-config.txt << 'EOF'

## Infrastructure Firewall Configuration for RHCOS

### Network Infrastructure Approach:
Since RHCOS is immutable, configure firewalls at:
1. Network switches/routers
2. External firewalls/security appliances
3. Cloud provider security groups
4. Virtualization platform (VMware NSX, etc.)
5. Load balancers with built-in firewalls

### Switch/Router ACL Configuration:
# Example Cisco ASA/Router ACL:
access-list OPENSHIFT_CONTROL_PLANE permit tcp any host <control-plane-1> eq 6443
access-list OPENSHIFT_CONTROL_PLANE permit tcp any host <control-plane-2> eq 6443
access-list OPENSHIFT_CONTROL_PLANE permit tcp any host <control-plane-3> eq 6443
access-list OPENSHIFT_CONTROL_PLANE permit tcp <cluster-network> <cluster-network> eq 22623
access-list OPENSHIFT_CONTROL_PLANE permit tcp <cluster-network> <cluster-network> range 2379 2380

# Example pfSense/OPNsense Rules:
# Rule 1: Allow external access to API (6443/tcp)
# Rule 2: Allow internal cluster communication (all required ports)
# Rule 3: Allow outbound to Red Hat registries (443/tcp)

# Apply micro-segmentation rules between groups
EOF
Network Security Considerations
# Document network security approach
cat >> firewall-config.txt << 'EOF'

## Network Security Best Practices:

### Segmentation:
# - Separate management network (BMC/IPMI)
# - Separate cluster network (node-to-node)
# - Separate external access network (load balancers)

### Access Control:
# - Restrict API access (6443/tcp) to authorized sources
# - Limit SSH access to management networks only
# - Control ingress traffic (80/443) through load balancers

### Monitoring:
# - Log firewall denials for security analysis
# - Monitor unusual traffic patterns
# - Alert on unauthorized access attempts

### Registry Access:
# - Allow outbound HTTPS to registry.redhat.io
# - Allow outbound HTTPS to quay.io
# - Configure proxy settings if required

## Firewall Testing:
# Test connectivity between nodes:
# nc -zv <node-ip> 6443    # API server
# nc -zv <node-ip> 2379    # etcd
# nc -zv <node-ip> 10250   # kubelet

# Test external access:
# curl -k https://<api-vip>:6443/version
# curl -I http://<ingress-vip>
EOF

echo "✅ Network security considerations documented"
C4: Boot Method Setup - Discovery ISO Preparation
The Assisted and Agent-based installers use discovery ISOs to automatically detect hardware and configure nodes. Based on installer-provisioned infrastructure documentation, choose your boot method:
Boot Method Options
Option A: Virtual Media (BMC/IPMI) - Recommended
Virtual media mounting via Baseboard Management Controllers (BMCs) based on virtual media requirements:
# Document your BMC addressing method
cat > boot-config.txt << 'EOF'
# OpenShift 4.19/4.20/4.21 Boot Method Configuration
# Virtual Media BMC Addressing Options

## Supported BMC Types and Addressing:

### Dell iDRAC (Integrated Dell Remote Access Controller):
# BMC Address Format: idrac-virtualmedia://<bmc-ip>
# Example: idrac-virtualmedia://192.168.1.10
# Reference: https://docs.redhat.com/en/documentation/openshift_container_platform/4.21/html/installing_on_bare_metal/installer-provisioned-infrastructure

### HPE iLO (Integrated Lights-Out):
# BMC Address Format: ilo5-virtualmedia://<bmc-ip> (for iLO5)
# BMC Address Format: redfish-virtualmedia://<bmc-ip> (for iLO4/iLO5 with Redfish)
# Example: ilo5-virtualmedia://192.168.1.11
# Example: redfish-virtualmedia://192.168.1.11
# Reference: https://docs.redhat.com/en/documentation/openshift_container_platform/4.21/html/installing_on_bare_metal/installer-provisioned-infrastructure

### Generic Redfish BMC:
# BMC Address Format: redfish-virtualmedia://<bmc-ip>
# Example: redfish-virtualmedia://192.168.1.12
# Supports: Supermicro, Lenovo, and other Redfish-compliant BMCs
# Reference: https://docs.redhat.com/en/documentation/openshift_container_platform/4.21/html/installing_on_bare_metal/installer-provisioned-infrastructure

### Legacy IPMI (Not recommended for new deployments):
# BMC Address Format: ipmi://<bmc-ip>
# Example: ipmi://192.168.1.13
# Note: Virtual media not supported, requires PXE boot

## Your BMC Configuration:
Node 1 BMC: [bmc-type]://[bmc-ip] (Username: [user], Password: [pass])
Node 2 BMC: [bmc-type]://[bmc-ip] (Username: [user], Password: [pass])
Node 3 BMC: [bmc-type]://[bmc-ip] (Username: [user], Password: [pass])

Selected Boot Method: VIRTUAL_MEDIA
BMC Type: [idrac-virtualmedia / ilo5-virtualmedia / redfish-virtualmedia]
EOF
Option B: PXE Boot (Network Boot)
Network boot from PXE server based on PXE assets preparation:
# Document PXE boot configuration
cat >> boot-config.txt << 'EOF'

## PXE Boot Configuration:
# Requirements:
# - PXE server configured on the network
# - DHCP server with PXE boot options
# - HTTP server to host discovery ISO contents

PXE Server IP: [pxe-server-ip]
DHCP Server IP: [dhcp-server-ip]
HTTP Server IP: [http-server-ip]
TFTP Root: [tftp-root-path]

# DHCP Configuration Required:
# option bootfile-name "pxelinux.0";
# next-server [pxe-server-ip];
EOF
Option C: USB/CD Boot (Physical Media)
Physical media boot for environments without network boot capabilities:
# Document physical media boot configuration
cat >> boot-config.txt << 'EOF'

## Physical Media Boot Configuration:
# Requirements:
# - Physical access to nodes
# - USB drives or CD/DVD drives
# - Ability to create bootable media

Boot Media Type: [USB / CD / DVD]
Physical Access: [Available / Scheduled]
Media Creation Tools: [dd, Rufus, balenaEtcher, etc.]

# Media Creation Commands:
# For Linux: dd if=discovery.iso of=/dev/sdX bs=4M status=progress
# For Windows: Use Rufus or balenaEtcher
# For macOS: dd if=discovery.iso of=/dev/diskX bs=4m
EOF
BMC Access Verification
Test BMC connectivity and virtual media capabilities:
# Test BMC connectivity and authentication
# Replace with your actual BMC credentials and IPs

# For Dell iDRAC:
ipmitool -I lanplus -H <idrac-ip> -U <username> -P <password> power status
ipmitool -I lanplus -H <idrac-ip> -U <username> -P <password> chassis status

# For HPE iLO:
ipmitool -I lanplus -H <ilo-ip> -U <username> -P <password> power status
ipmitool -I lanplus -H <ilo-ip> -U <username> -P <password> chassis status

# For Generic Redfish BMC:
curl -k -u <username>:<password> https://<bmc-ip>/redfish/v1/Systems/
curl -k -u <username>:<password> https://<bmc-ip>/redfish/v1/Managers/

# Test virtual media capabilities (if supported):
# This varies by BMC type - consult manufacturer documentation
Boot Infrastructure Preparation
Prepare the infrastructure for your chosen boot method:
# For Virtual Media BMC Boot:
# 1. Ensure BMC firmware is up to date
# 2. Configure BMC network settings
# 3. Enable virtual media in BMC settings
# 4. Test ISO mounting capabilities

# For PXE Boot:
# 1. Configure PXE server with discovery ISO contents
# 2. Set up DHCP server with PXE boot options
# 3. Configure HTTP server for file serving
# 4. Test network boot from target nodes

# For USB/CD Boot:
# 1. Prepare bootable media creation tools
# 2. Test media creation process
# 3. Ensure physical access to all nodes
# 4. Plan media distribution logistics

echo "✅ Boot infrastructure prepared for selected method"
Discovery ISO Boot Process
Understanding how discovery ISOs work with modern installers:
# Document the discovery process
cat >> boot-config.txt << 'EOF'

## Discovery ISO Boot Process:
1. Node boots from discovery ISO (via BMC, PXE, or physical media)
2. Discovery agent runs and detects:
   - CPU cores, memory, storage capacity
   - Network interfaces and connectivity
   - Hardware compatibility and architecture
   - BMC/IPMI capabilities

3. Discovery data is sent to:
   - Assisted Installer: Red Hat cloud service
   - Agent-based Installer: Local assisted service

4. Installer validates:
   - Hardware meets minimum requirements
   - Network connectivity is adequate
   - Nodes can communicate with each other
   - DNS resolution works properly

5. Installation proceeds automatically once all validations pass
EOF

echo "✅ Discovery ISO boot process documented"
✅ C4 Verification Checkpoint: Boot method selected, BMC access verified, and infrastructure prepared for discovery ISO deployment.
C5: BIOS Configuration - UEFI, Secure Boot, Network Boot
Required BIOS/UEFI Settings
Starting with OpenShift 4.19, Secure Boot can be enabled on supported hardware (Dell PowerEdge Gen13+, HPE ProLiant Gen10+) using the bootMode: UEFISecureBoot option in agent-config.yaml or via the Assisted Installer console. For most standard deployments and all other hardware, Secure Boot should remain disabled. See the OCP 4.21 bare metal installation guide for Secure Boot prerequisites.
|
# Configure on ALL nodes (standard deployment):
# ✅ UEFI mode enabled (required - Legacy BIOS not supported for new installs)
# ✅ Secure Boot: DISABLED for standard installs (see note above for exceptions)
# ✅ Network boot enabled on primary interface
# ✅ Virtualization extensions enabled (VT-x/AMD-V)
# ✅ Boot order: Network/USB/CD before hard drive

# Create BIOS checklist:
cat > bios-checklist.txt << 'EOF'
# Secure Boot guidance:
#   Standard hardware:         Disabled (default, required)
#   Supported Dell/HPE (4.19+): Can enable via bootMode: UEFISecureBoot in agent-config.yaml
#   Reference: https://docs.redhat.com/en/documentation/openshift_container_platform/4.21/html/installing_on_bare_metal/

Node 1: [hostname]
☐ UEFI Mode: Enabled
☐ Secure Boot: Disabled (or enabled if using bootMode: UEFISecureBoot on supported HW)
☐ Network Boot: Enabled
☐ Virtualization: Enabled
☐ Boot Order: Network first

Node 2: [hostname]
☐ UEFI Mode: Enabled
☐ Secure Boot: Disabled (or enabled if using bootMode: UEFISecureBoot on supported HW)
☐ Network Boot: Enabled
☐ Virtualization: Enabled
☐ Boot Order: Network first

Node 3: [hostname]
☐ UEFI Mode: Enabled
☐ Secure Boot: Disabled (or enabled if using bootMode: UEFISecureBoot on supported HW)
☐ Network Boot: Enabled
☐ Virtualization: Enabled
☐ Boot Order: Network first
EOF
✅ C5 Checkpoint: All nodes configured with proper BIOS settings.
Module 2 Completion
Final Verification
# Verify all components completed:
echo "C1 - Red Hat Account Setup: ✅"
echo "C2 - Hardware Inventory: ✅"
echo "C3 - DNS Planning: ✅"
echo "C4 - Boot Method Setup: ✅"
echo "C5 - BIOS Configuration: ✅"

# You are now ready to proceed to:
# - Module 3: Assisted Installer (connected environments)
# - Module 4: Agent-based Installer (disconnected environments)
Continue to your chosen installation method based on your environment requirements.
Next Steps
Ready to Deploy?
-
For connected environments, proceed to Module 3: Deploying OpenShift using Assisted Installer.
-
For disconnected environments, proceed to Module 4: Deploying OpenShift using Agent-based Installer.